Ah, sportsball. Can you ever forget the first time you grab that pass, fly down the court, and sink that puck right through the net as your fans yell adoringly from the bleachers, TOUCHDOWN!
No? Not ringing a bell? Me neither. That’s what you get when you spend your high school years learning calculus and icing pi on cookie cakes instead of doing sports.

It’s time you never get back. Unless, of course, you figure out a way to use that high school math to become a better athlete.
Which is what we’ll be looking at today. In this article, I’ll show you how to use machine learning to analyze your performance in your sport of choice (as an example, I’ll be using my tennis serve, but you can easily adopt the technique to other games). By the way, this project was inspired by my recent interview with Zack Akil, who used the same techniques to analyze penalty kicks in soccer.
Machine learning plays an important role in sports: companies use it to identify players’ unique talents, detect injuries earlier, and broker optimal player trades. Plus, almost every professional sport (NFL, NHL, MLB, NBA, soccer, golf, cricket, to name a few) uses ML technology for tracking. The NBA, for example, has deployed a sophisticated vision-based system all on courts, tracking players’ motions, reading numbers off their jerseys, analyzing how fast they pass the ball, and determining how accurately they shoot under pressure.
But as a beginner, I’d love to use that same technology simply to tell me what I’m doing wrong and where I’m making mistakes. Ideally, I’d build an app that I set up on my phone and mount on a tripod (for example) while I’m on the tennis court that analyzes video of me serving and gives me helpful tips (i.e. “straighten your arm,” “bend your knees”). In this article, I’ll show you the core techniques that would make an app like that possible.
Want to jump straight to the code? Check out the repo on Github.
Using machine learning to analyze my tennis serve
A few weeks ago, I went to a tennis court, set up a tripod, and captured some footage of me serving a tennis ball. I sent it to my friend JT, a tennis coach, and asked him what I was doing wrong. He sent back this:


You can see it was kind of a bloodbath.
But what JT had done was very useful–he analyzed key parts of my serve that differed from those of professional athletes. Wouldn’t it be neat if a machine learning model could do the same thing? Compare your performance with professionals and let you know what you’re doing differently?
With JT’s feedback in hand, I decided to focus on three facets of serving:
- Were my knees bent as I served?
- Was my arm straight when I hit the ball?
- How fast did the ball actually travel after I hit it? (This one was just for my personal interest)
Analyzing posture with pose detection
To compute the angle of my knees and arms, I decided to use pose detection–a machine learning technique that analyzes photos or videos of humans and tries to locate their body parts. There are lots of tools you can use to do pose detection (like TensorFlow.js), but for this project, I wanted to try out the new Person Detection (beta!) feature of the Google Cloud Video Intelligence API. (You might recognize this API from my AI-Powered Video Archive, where I used it to analyze objects, text, and speech in my family videos.) The Person Detection feature recognizes a whole bunch of body parts, facial features, and clothing. From the docs:

To start, I clipped the video of my tennis serves down to just the sections where I was serving. Since I only caught 17 serves on camera, this took me about a minute. Next, I uploaded the video to Google Cloud Storage and ran it through the Video Intelligence API. All that code is conveniently documented in a Colab notebook which you can run yourself on your own video (you’ll just need a Google Cloud account). The notebook even shows you how to set up authentication and create buckets and all that jazz. The interesting bit–analyzing pose–is this bit:
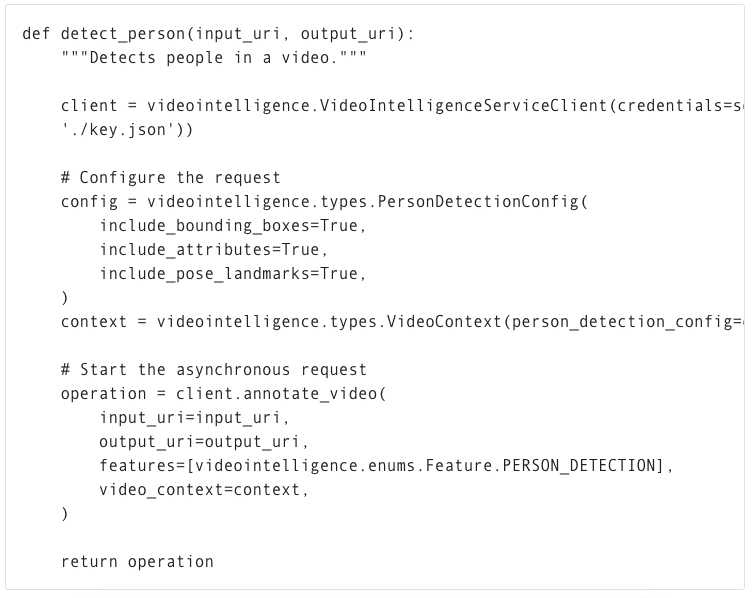
To call the API, you pass the location in Cloud Storage where your video is stored as well as a destination in cloud storage where the Video Intelligence API can write the results.
Here, I’m calling the asynchronous version of the Video Intelligence API. It analyzes video on Google’s backend, in the cloud, even after my notebook is closed. This is convenient for long videos, but there’s also a synchronous and streaming version of this API!
When the Video Intelligence API finished analyzing my video, I visualized the results using this neat tool built by @wbobeirne. It spits out neat visualization videos like this:
Pose detection makes a great pre-processing step for training machine learning models. For example, I could use the output of the API (the position of my joints over time) as input features to a second machine learning model that tries to predict (for example) whether or not I’m serving, or whether or not my serve will go over the net. But for now, I want to do something much simpler: analyze my serve with high school math!
For starters, I plotted the y position of my left and right wrists over time:
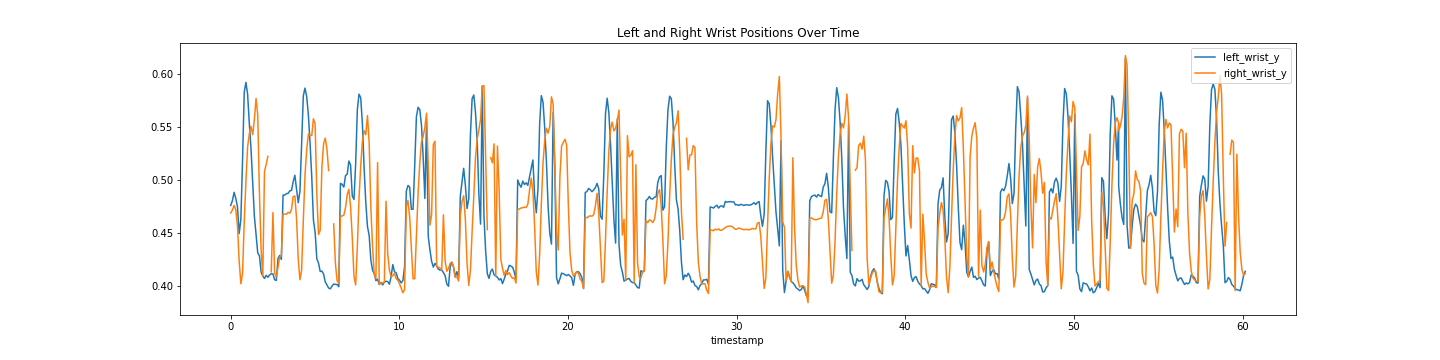
It might look messy, but that data actually shows pretty clearly the lifetime of a serve. The blue line shows the position of my left wrist, which peaks as I throw the tennis ball a few seconds before I hit it with my racket (the peak in the right wrist, or orange line).
Using this data, I can tell pretty accurately at what points in time I’m throwing the ball and hitting it. I’d like to align that with the angle my elbow is making as I hit the ball. To do that, I’ll have to convert the output of the Video Intelligence API–raw pixel locations–to angles. How do you do that? The Law of Cosines, duh! (Just kidding, I definitely forgot this and had to look it up. Here’s a great explanation and some Python code.)
The Law of Cosines is the key to converting points in space to angles. In code, that looks something like:
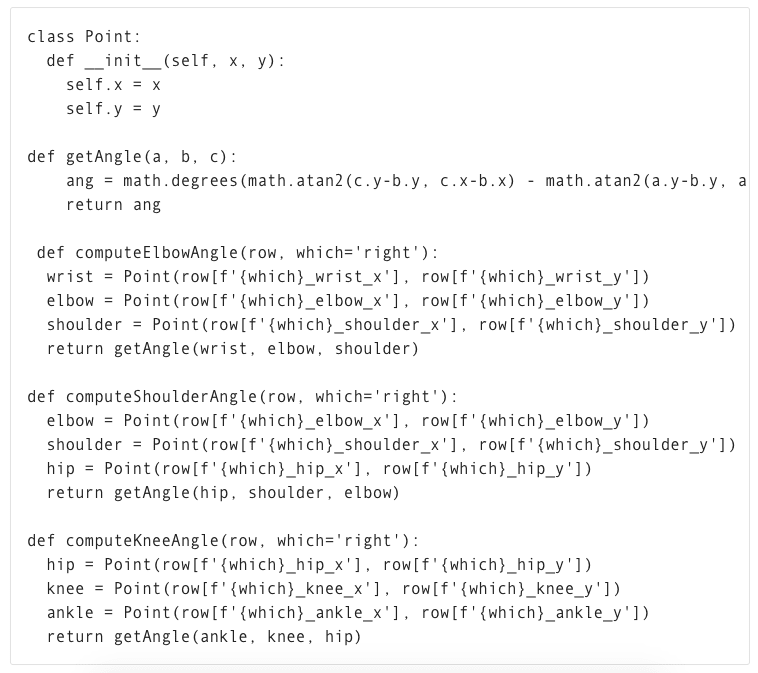
Check out the notebook to see all the details. Using these formulae, I plotted the angle of my elbow over time:
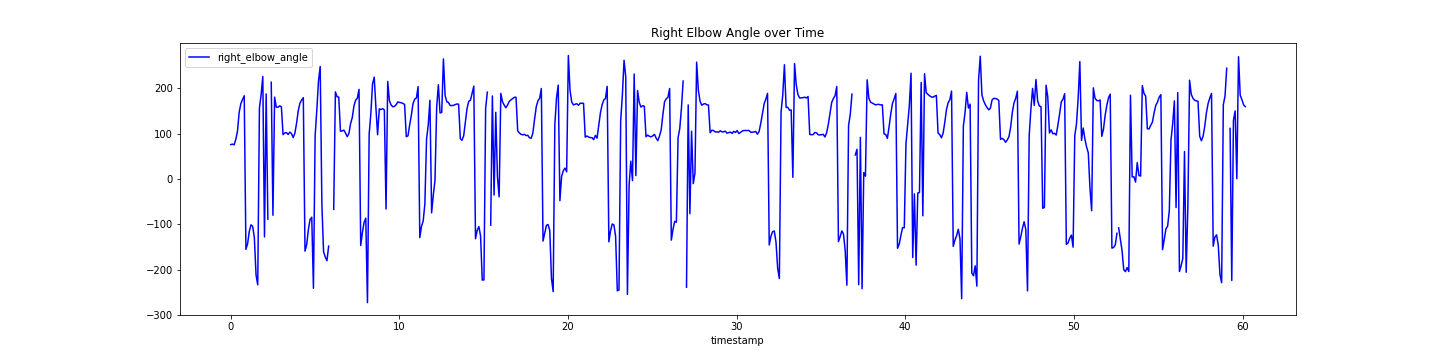
By aligning the height of my wrist and the angle of my elbow, I was able to determine the angle was around 120 degrees (not straight!). If JT hadn’t told me what to look for, it would have been nice for an app to catch that my arm angle was different from professionals and let me know.
I used the same formula to calculate the angles of my knees and shoulders. Again, check out more details in the notebook.
Computing the speed of my serve
Pose detection let me compute the angles of my body, but I also wanted to compute the speed of the ball after I hit it with my racket. To do that, I had to be able to track the tiny, speedy little tennis ball over time.

I handled this the way Zack did in his Football Pier project: I trained a custom AutoML Vision model.
If you’re not familiar with AutoML Vision, it’s a no-code way to build computer vision models using deep neural networks. The best part is, you don’t have to know anything about ML to use it! The worst part is the cost. It’s pricey (more on that in a minute).
AutoML Vision lets you upload your own labeled data (i.e. with labeled tennis balls) and trains a model for you.
Training an object detection model with AutoML vision
To get started, I took a thirty second clip of me serving and split it into individual pictures I could use as training data to a vision model:

You can run that command from within the notebook I provided, or from the command line if you have ffmpeg installed. It takes an mp4 and creates a bunch of snapshots (here at fps=20, i.e. 20 frames per second) as jpgs. The -ss flag controls how far into the video the snapshots should start (i.e. start “seeking” at 1 second) and the flag -t controls how many seconds should be included (30 in this case).
Once you’ve got all your snapshots created, you can upload them to Google Cloud storage with the command:

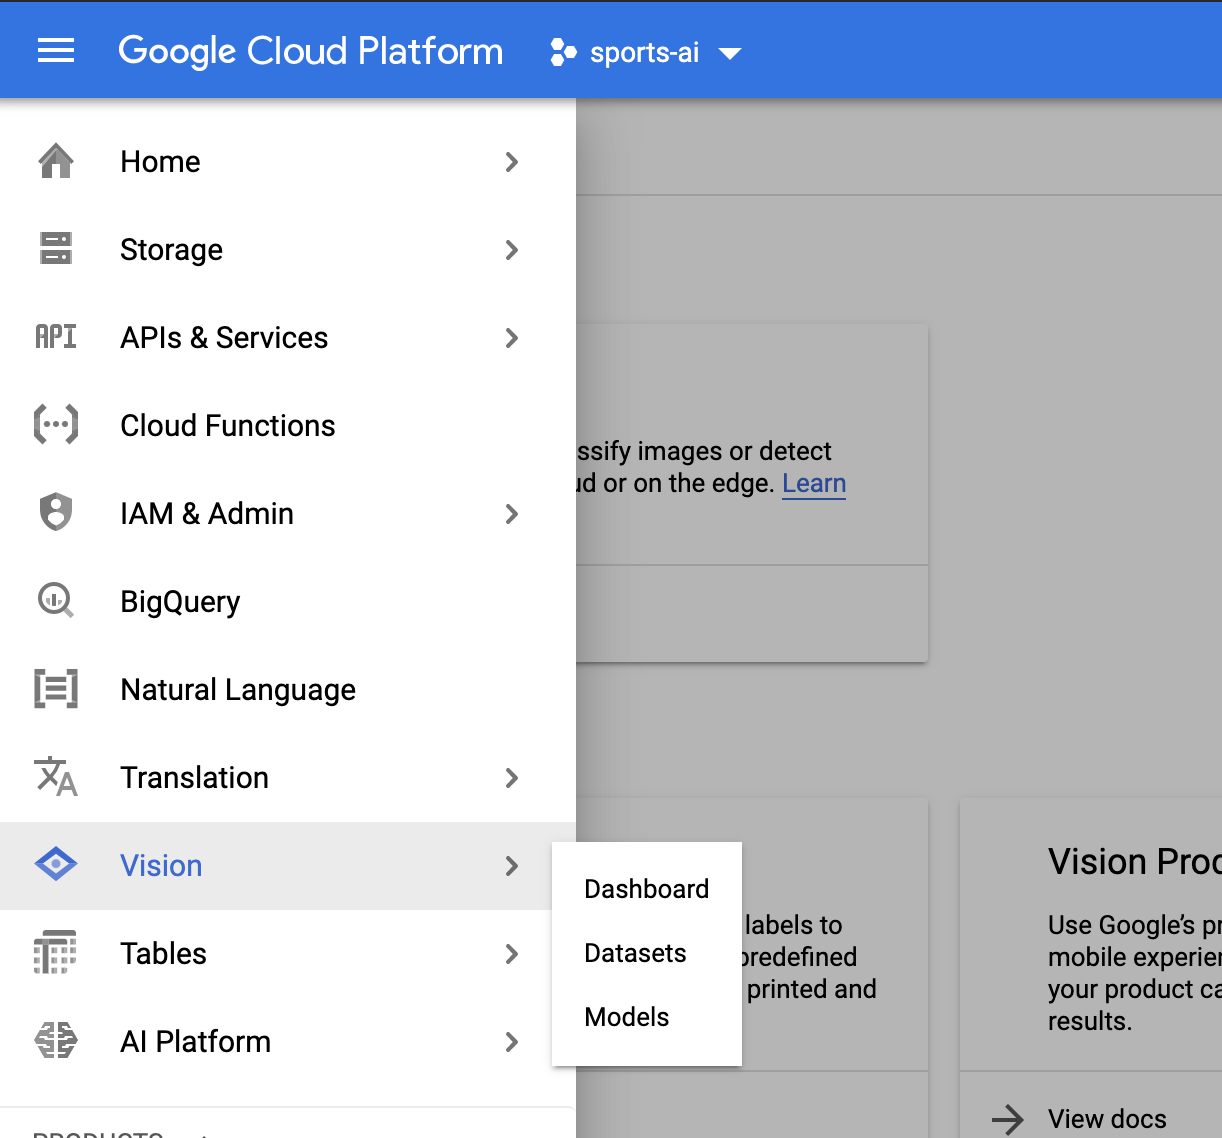
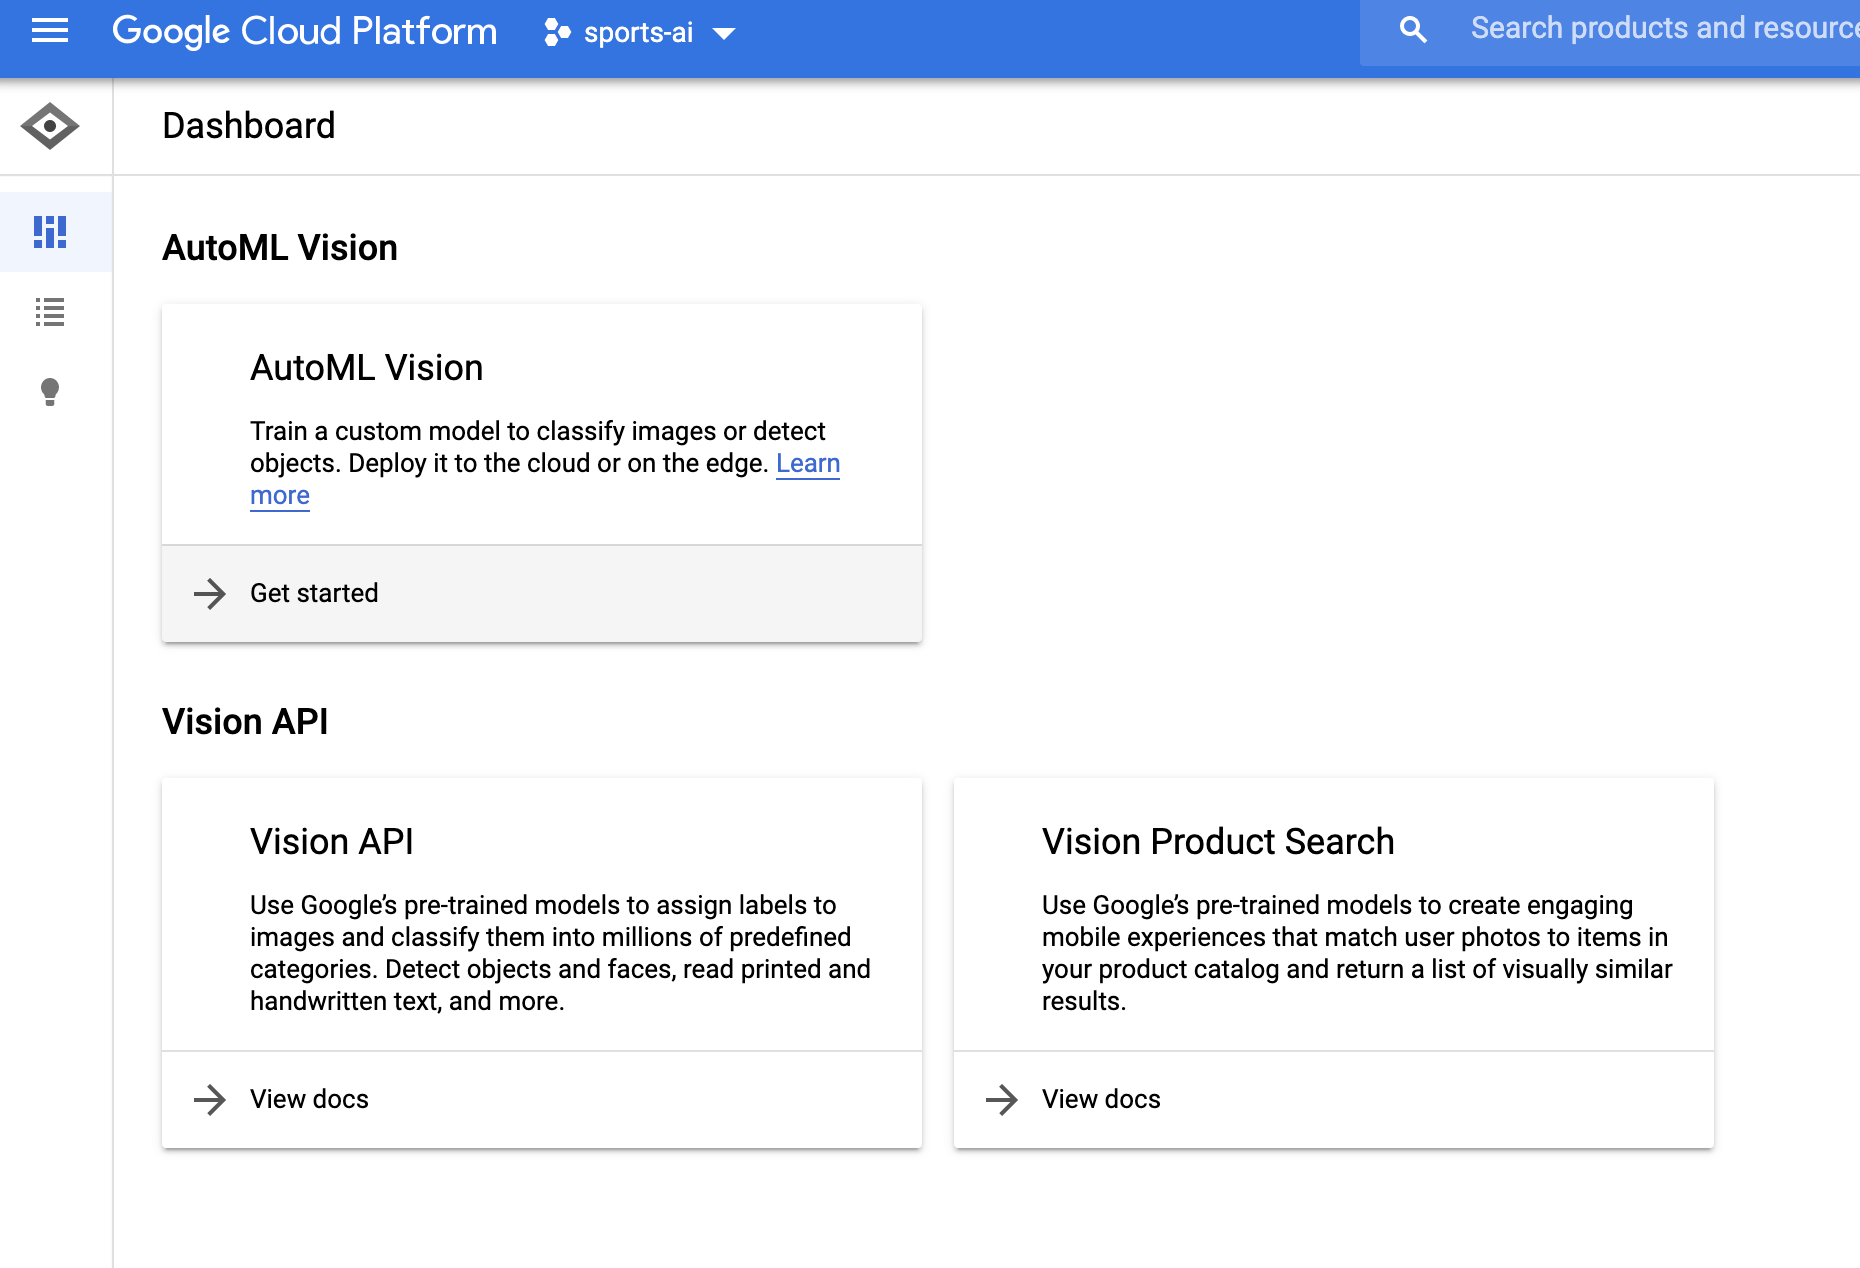
Next, navigate to the Google Cloud console and select Vision from the left hand menu:
Create a new AutoML Vision Model and import your photos.
Quick recap: what’s a Machine Learning classifier? It’s a type of model that learns how to label things from example. So to train our own AutoML Vision model, we’ll need to provide some labeled training data for the model to learn from.
Once your data has been uploaded, you should see it in the AutoML Vision “IMAGES” tab:

Here, you can start applying labels. Click into an image. In the editing view (below), you’ll be able to click and drag a little bounding box:
Congratulations, you have just begun a long and rewarding career as a data labeler. Next stop, MIT!
For my model, I hand-labeled about 300 images which took me ~30 minutes. Once you’re done labeling data, it’s just one click to train a model with AutoML–just click the “Train New Model” button and wait.
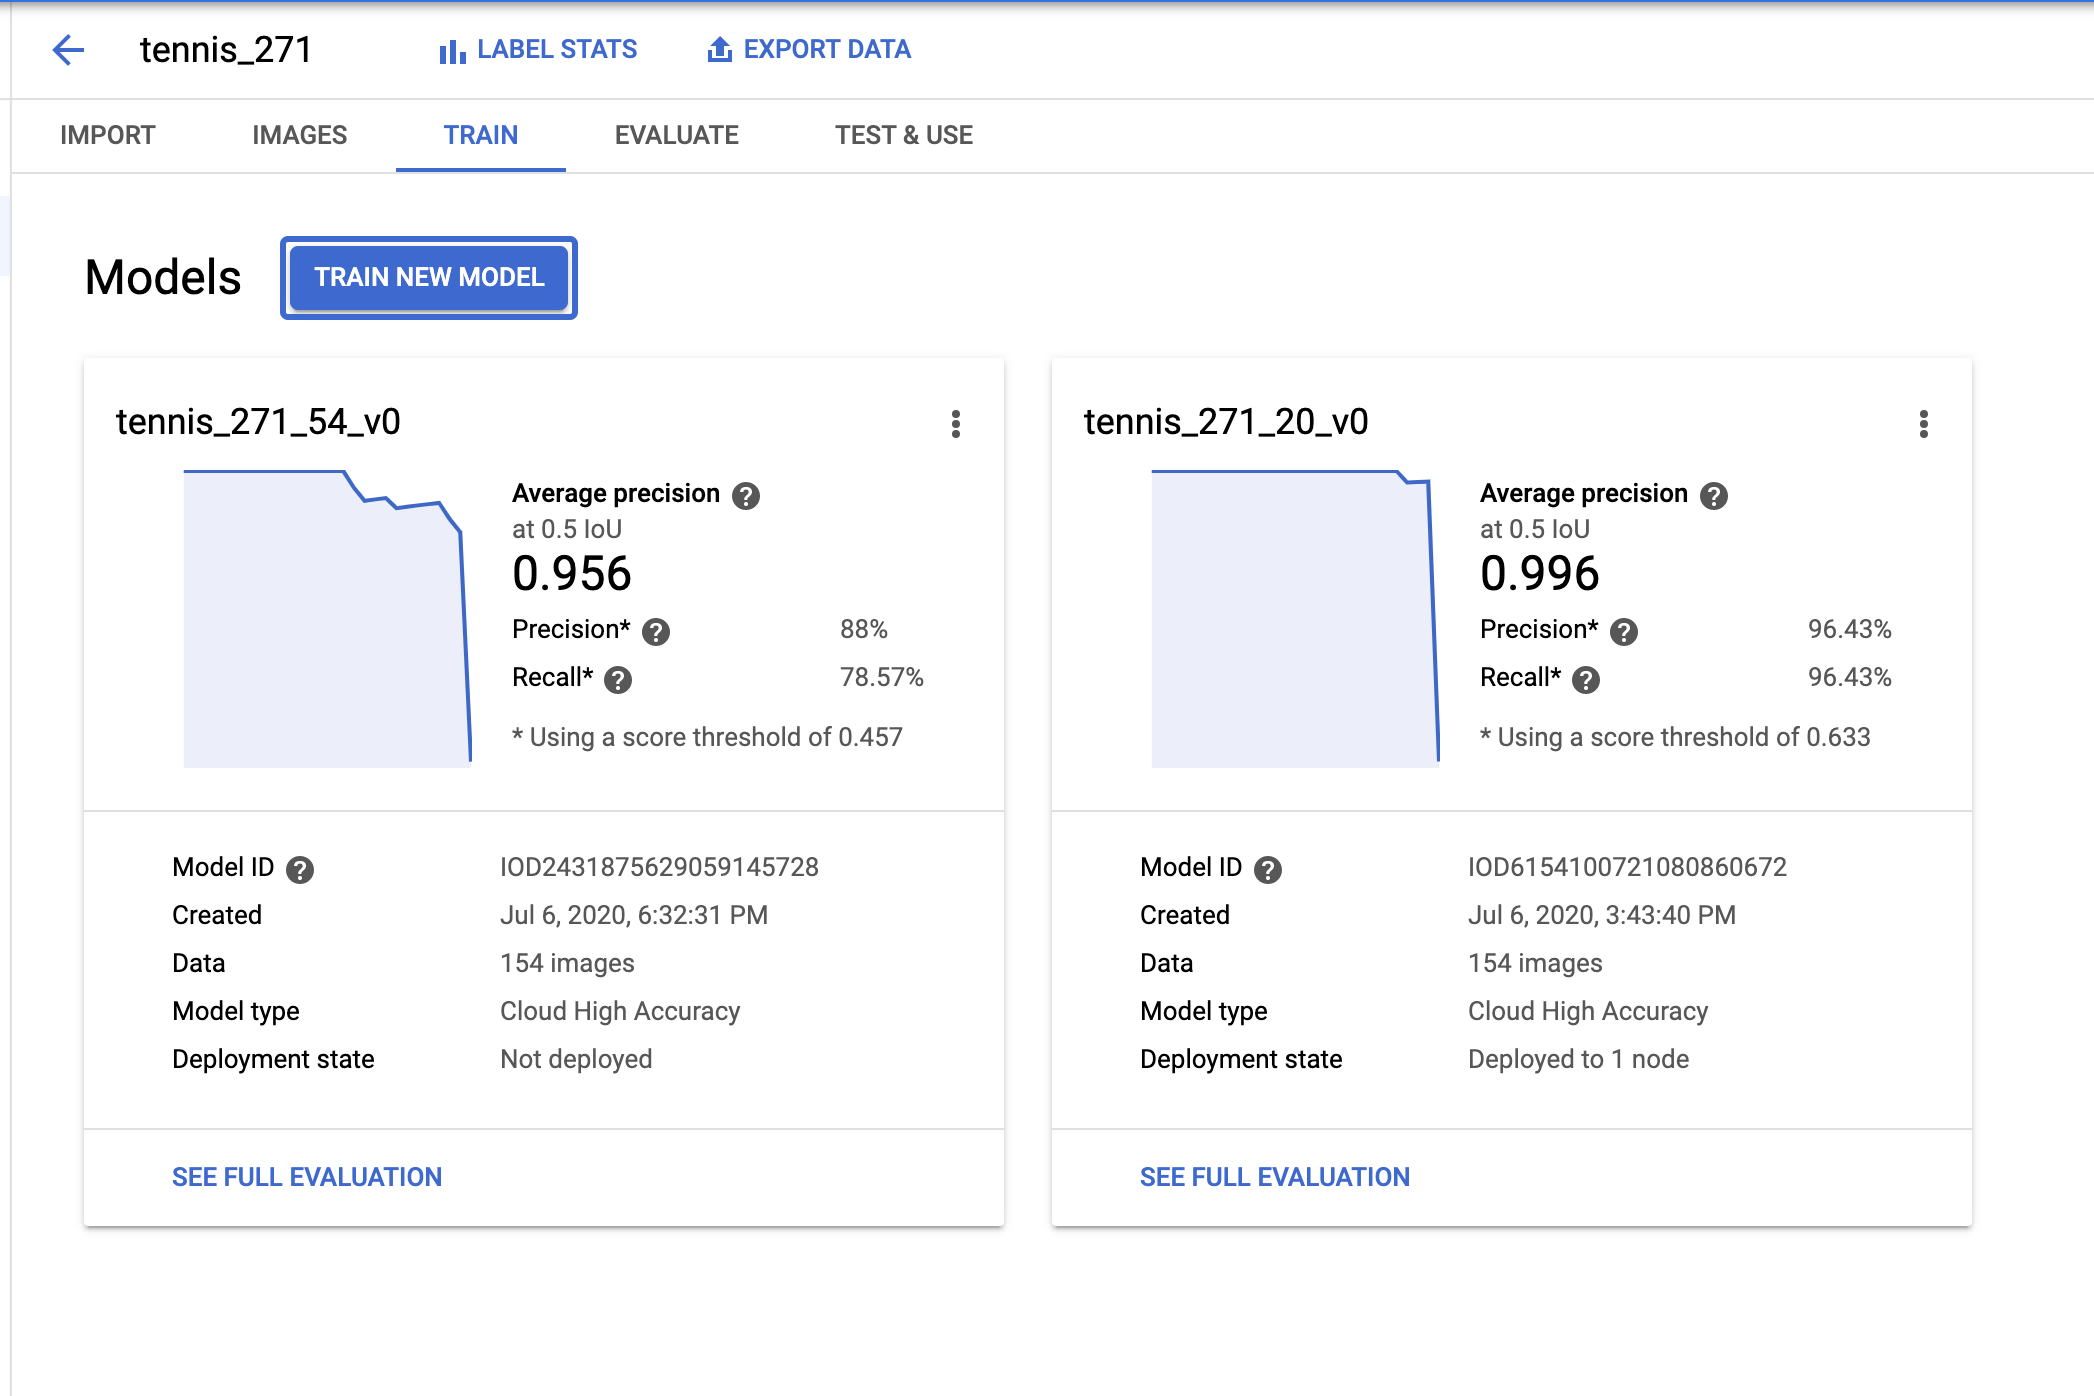
When your model is done training, you’ll be able to evaluate its quality in the “Evaluate” tab below.
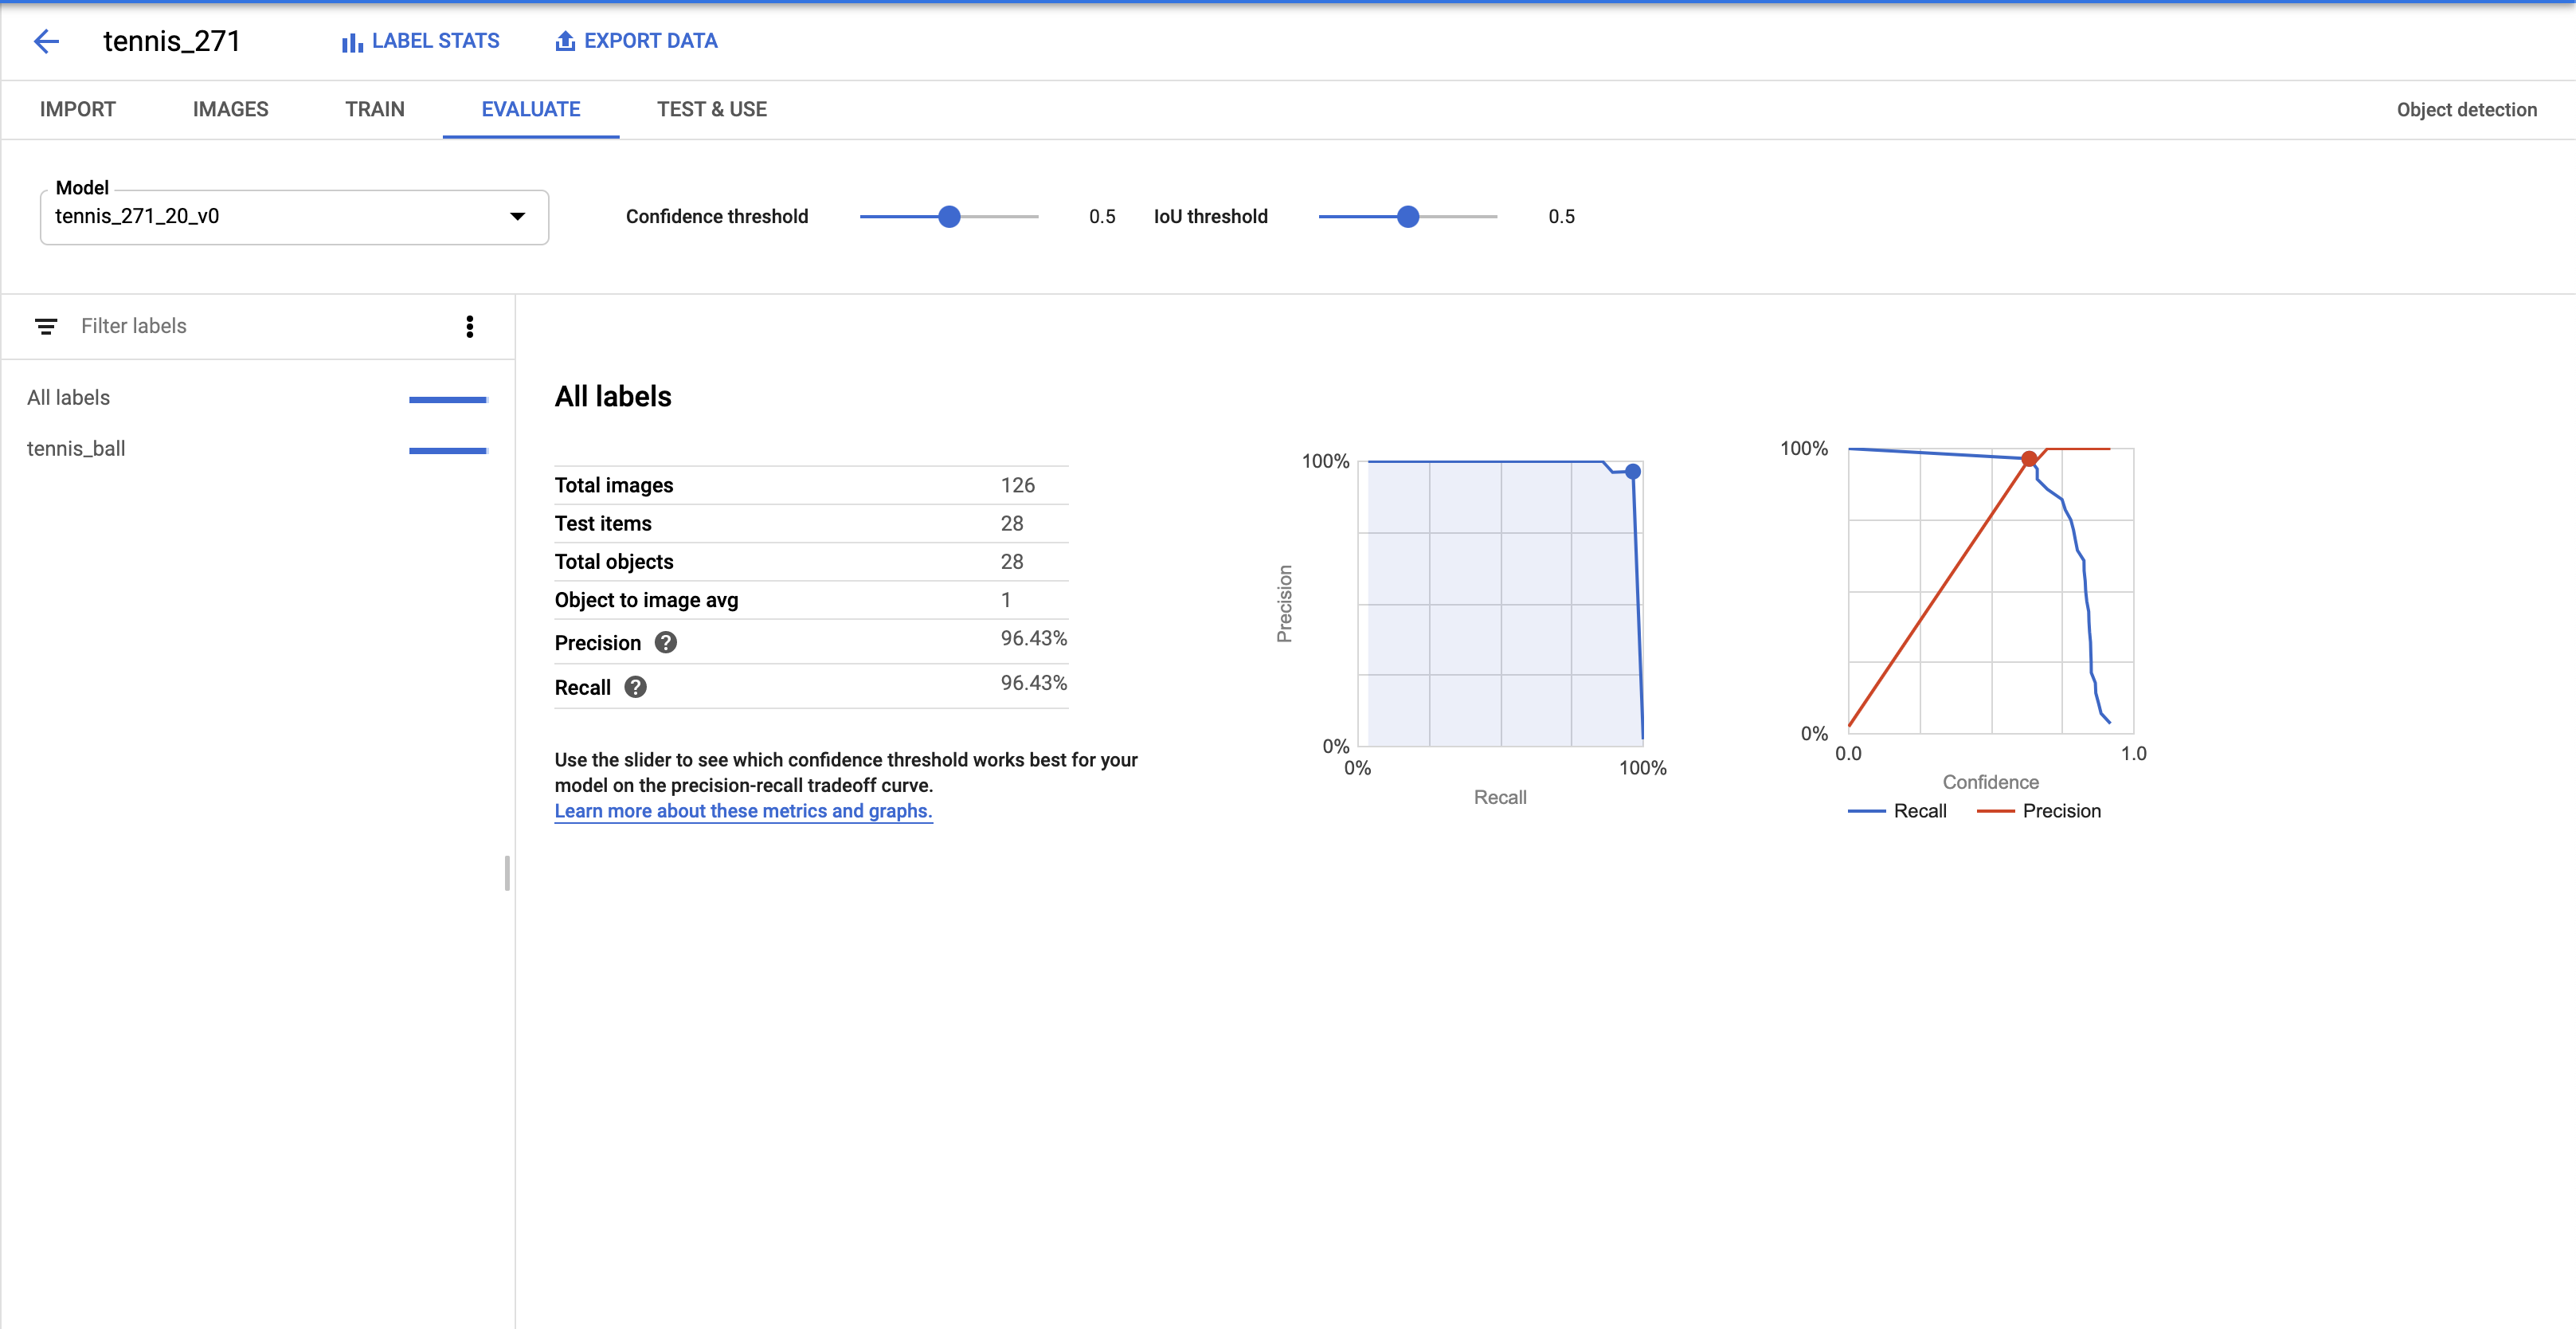
As you can see, my model was pretty darn accurate, with about 96% precision and recall–hot dog!
This was more than enough to be able to track the position of the ball in my pictures, and therefore calculate its speed:
Once you’ve trained your model, you can use the code in Jupyter notebook to make a cute ‘lil video like the one I plotted above.
You can then use this to plot the position of the ball over time, to calculate speed (see the notebook for more details):
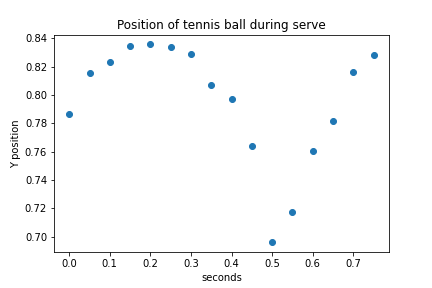
Unfortunately, I realized too late I’d made a grave mistake here. What is speed? Change in distance over time, right? But because I didn’t actually know the distance between me, the player, and the camera, I couldn’t compute distance in miles or meters–only pixels! So I learned I serve the ball at approximately 200 pixels per second. Nice.
So there you have it–some techniques you can use to build your own sports machine learning trainer app!
A Note on Cost
Disclaimer: I work for Google, and I use Google Cloud for free. I try to recommend free tools here whenever possible, but I turn to GCP by instinct, and sometimes I don’t notice the cost.
Whelp, when it came to AutoML Vision, that turned out to not be a great idea. Here’s what this project cost me:
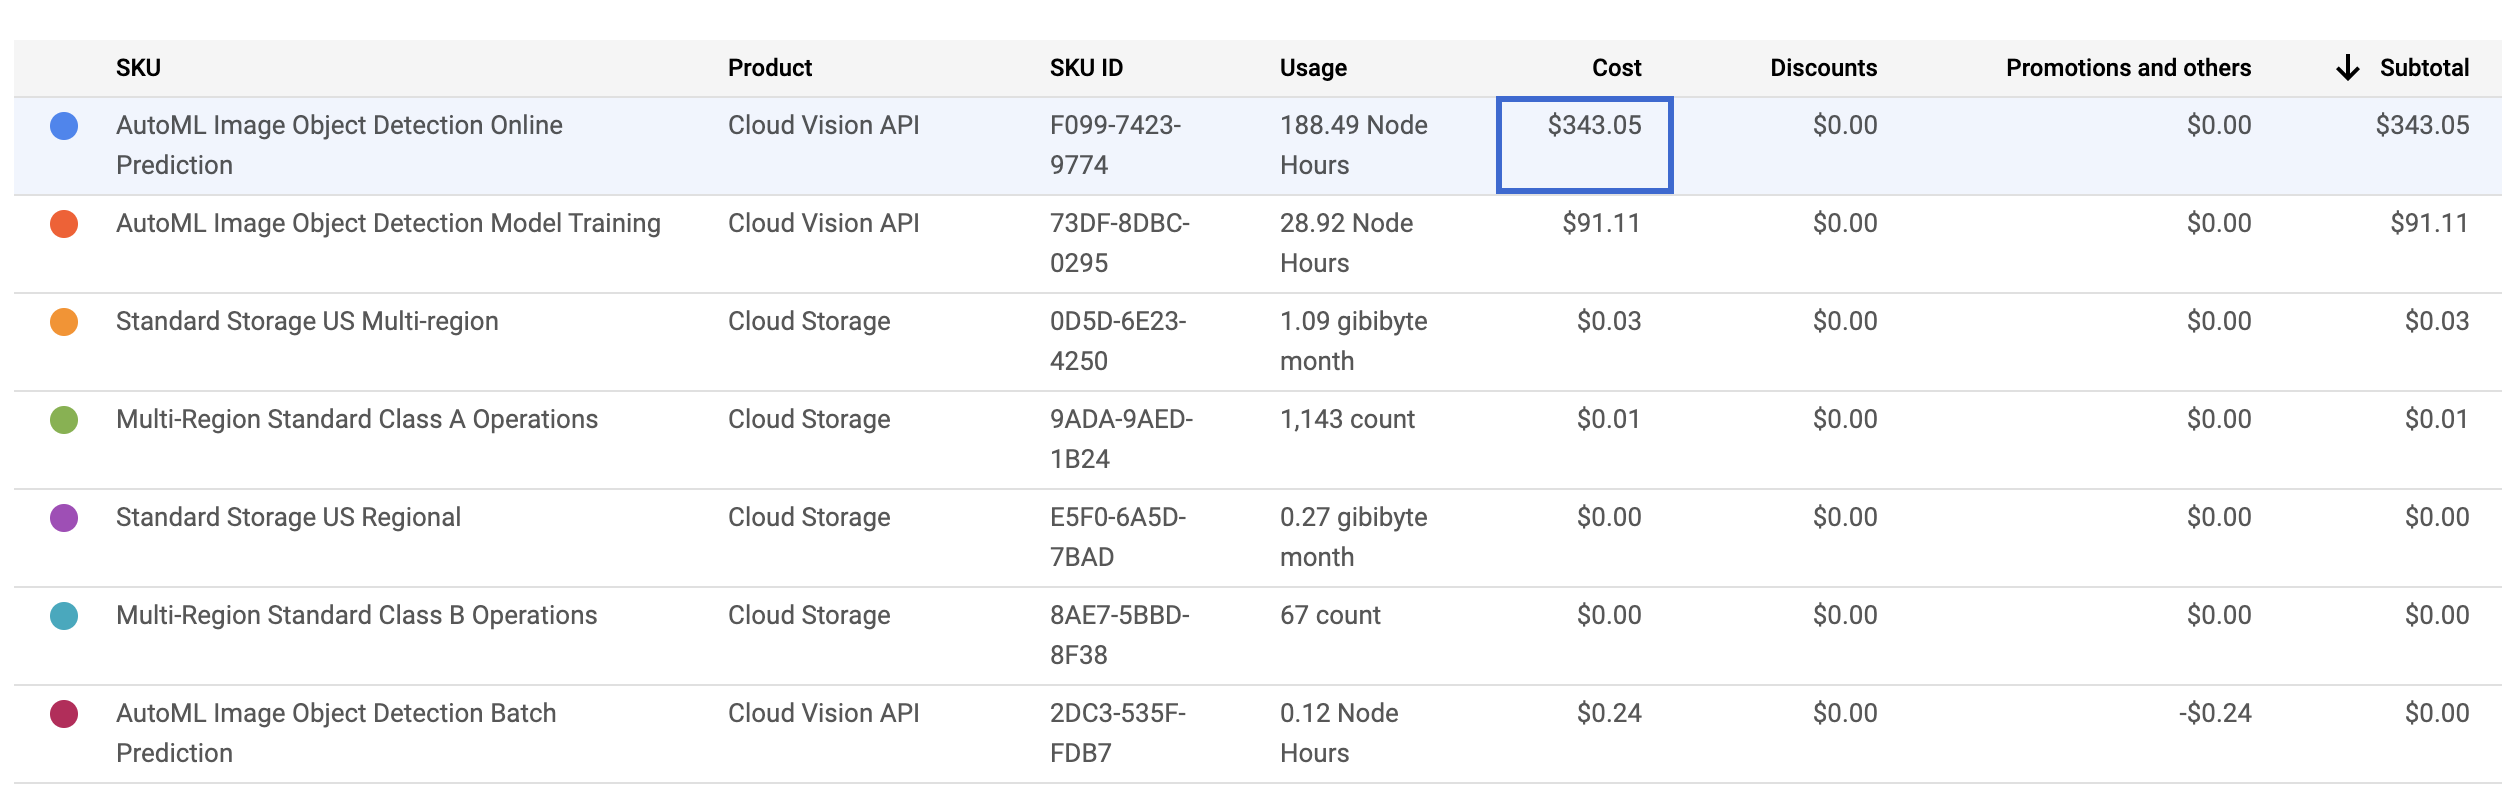
The whole thing was about ~450 bucks–_ouch_. But, before you get entirely turned off by the $$, let’s break things down:
I trained two AutoML models, and the cost of training for both was $91.11. Sure, that’s pricey, but the quality was pretty high and maybe for certain business use cases, it makes sense.
The real cost comes from that first line item–AutoML Image Object Detection Online Prediction. What’s that? It’s the cost Google charges for hosting your model for you in the cloud, so that you can call it with a standard REST API. Weirdly, you’re continually charged for the cost of hosting this model, even if you’re not making predictions against it, which really makes the cost rack up fast.
The good news is that AutoML Vision runs in three ways:
- You can configure a model to be hosted in the cloud, where you can hit it at a REST endpoint at any time (most expensive).
- You can use it in batch mode only (predictions are run in an asynchronous fashion, not for real-time use cases), which wipes out most of that additional cost.
- You can actually train your model to be exportable, allowing you to download it as a TensorFlow model and use it offline. This also brings down the cost significantly.Or, you can forgo AutoML altogether and brave it on your own with TensorFlow or PyTorch. Good luck–and let me know what you choose.
Get the TNW newsletter
Get the most important tech news in your inbox each week.