I recently made a chatbot for recruiters to interact with my portfolio, which garnered some attention on Twitter:
You can interact with it here.
This was a simple experiment I did to manage recruitment emails and job applications, inspired by Big Kid Lab. My original intention was to showcase my resourceful skills and get hands-on experience with conversational AI design, but I added some bolder questions to filter out recruiters who represent companies that don’t align with my values. It’s rather alarming if a company still hasn’t taken a stance of support for BLM or other social justice issues at this point. Being a woman of color in tech, I know that their silence represents a larger implication of the way I would be seen and treated in that work environment.
[Read:
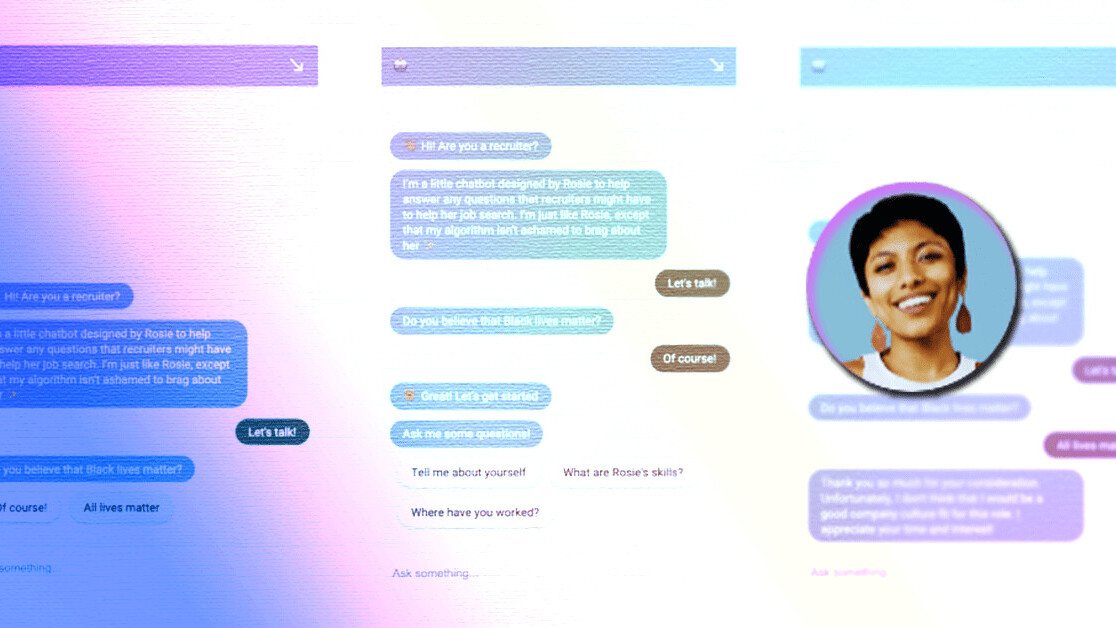
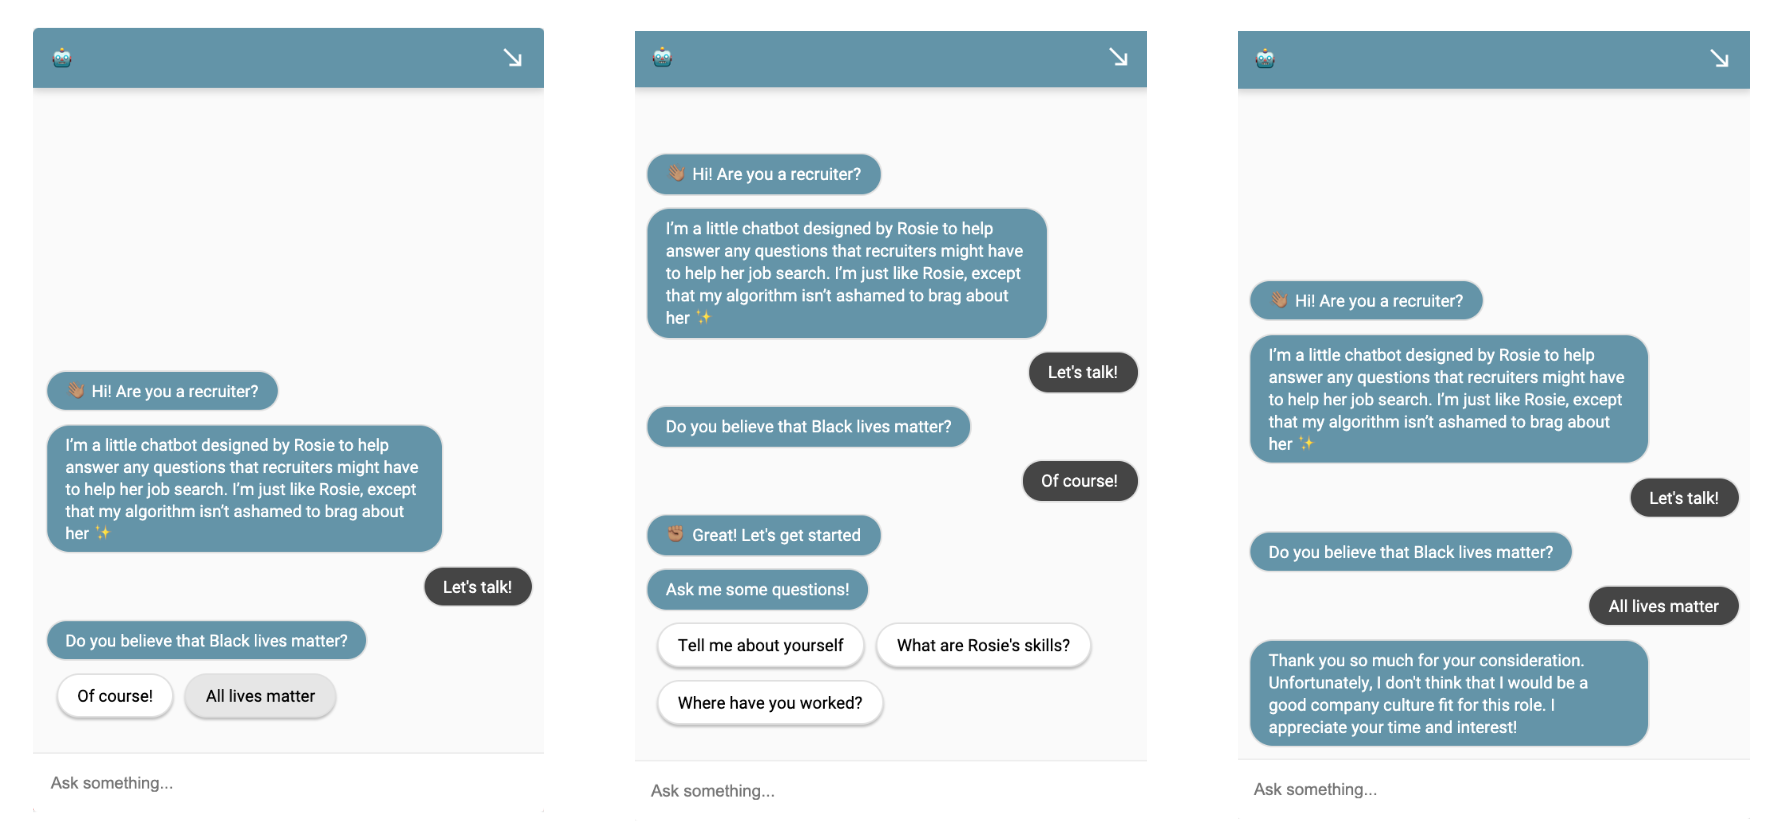
Before the recruiter can interact with my chatbot, they are prompted with a defining question: do you believe that Black lives matter? If they respond no, or try to further belittle the cause by saying that all lives matter, the conversation ends immediately. If not, the recruiter may continue interacting with the bot which answers a series of questions about my work history, experience, goals, etc.
This is just an automated chatbot, so by no means the defining endpoint of my engagement — I always thoroughly research what initiatives the company has taken, what causes they fight for, and what their company culture is like. But from basic psychology, I know that the recruiter engaging with my site will look at this question and either (1) be so taken aback and turned off by this “unprofessional” question that they don’t contact or (2) contact me. The latter, I assume, will have a basic understanding of how our society continually oppresses marginalized communities, and why using their platform to speak out is so important.
Due to popular demand, I’m writing this article as a short tutorial on how to make your own chatbot and the steps I took to get there. I’d never done any conversational AI design before this project, but picked up the tools pretty easily. It’s simple, free, and pretty fun to implement — anyone can do it! Hopefully, this small guide can help people get started.
How to do it
I started by researching my chatbot options. There are quite a few options out there, but I went with DialogFlow, which is free and has more advanced NLP capabilities. They have very detailed documentation on how to get started.
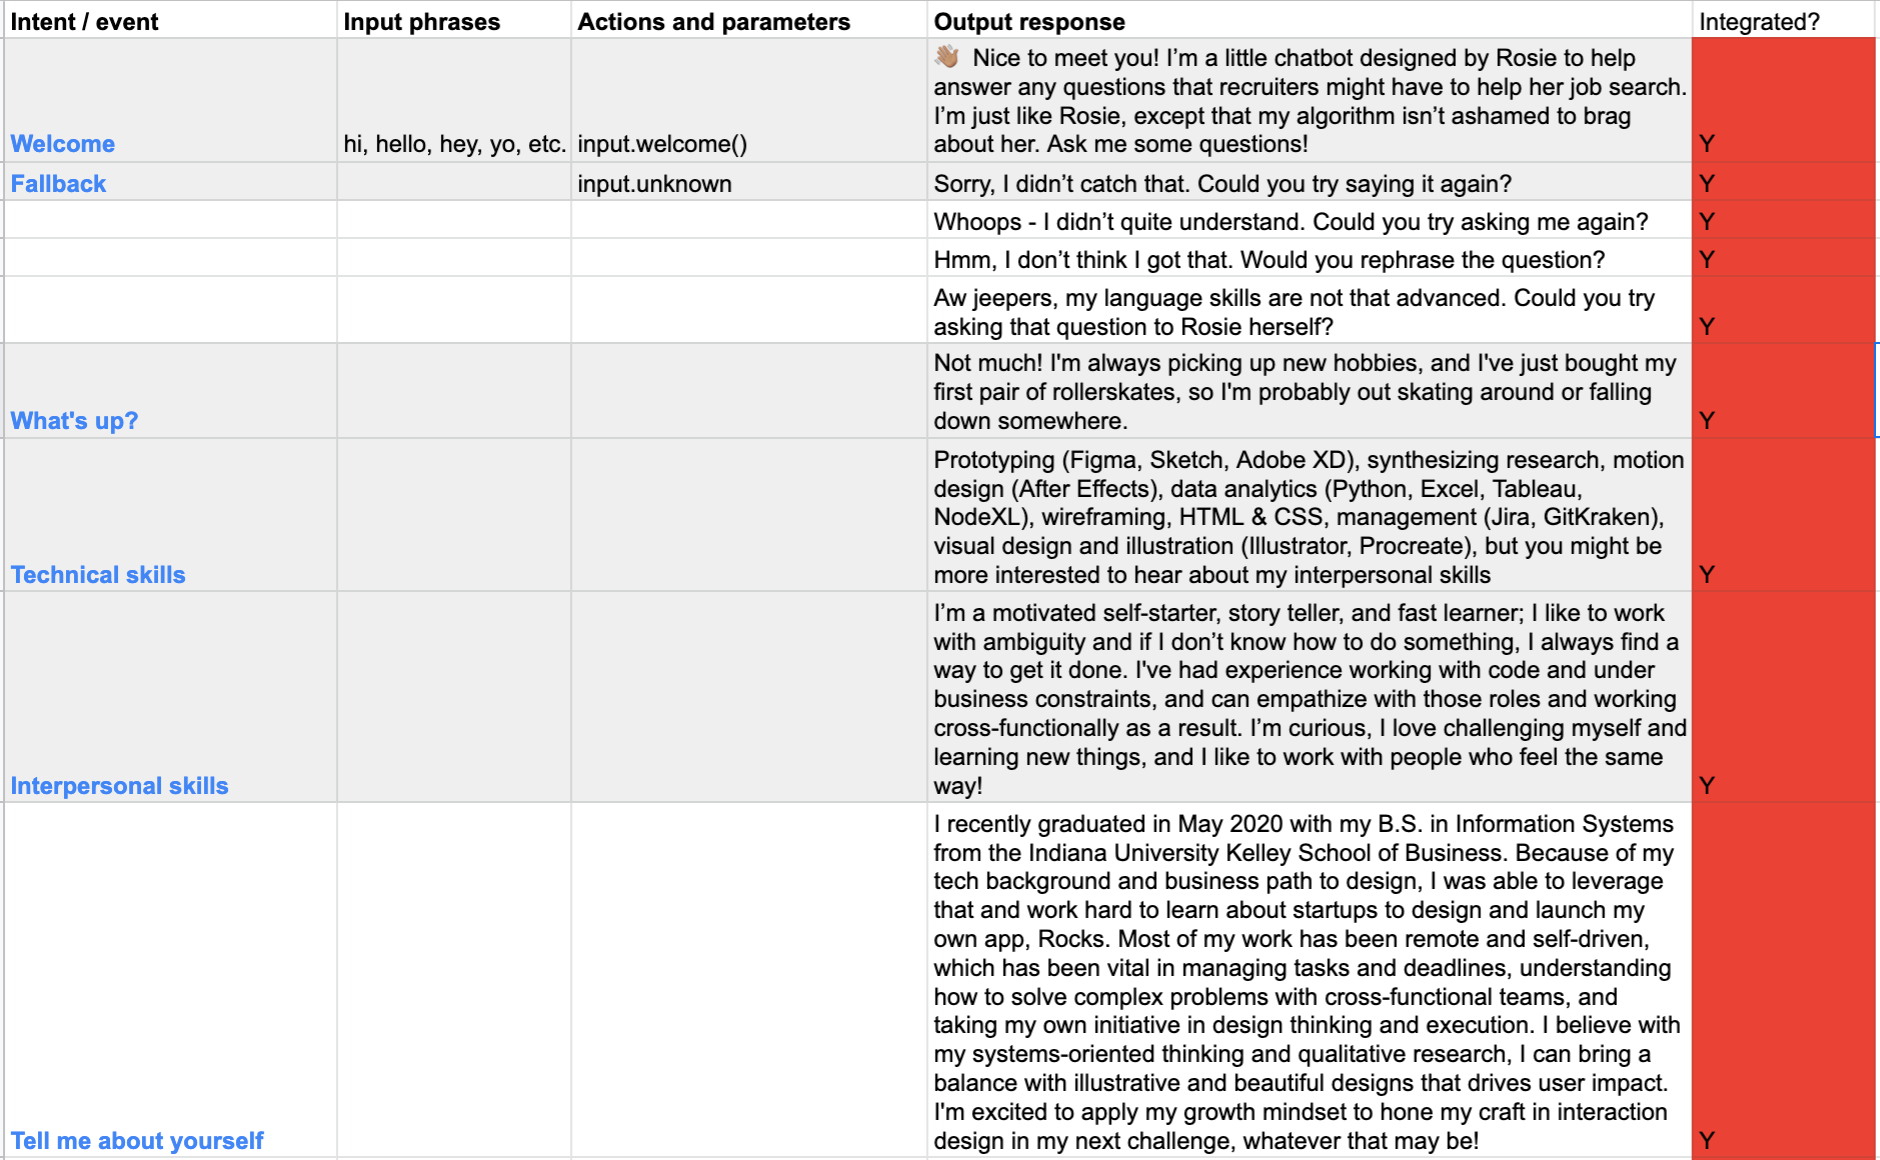
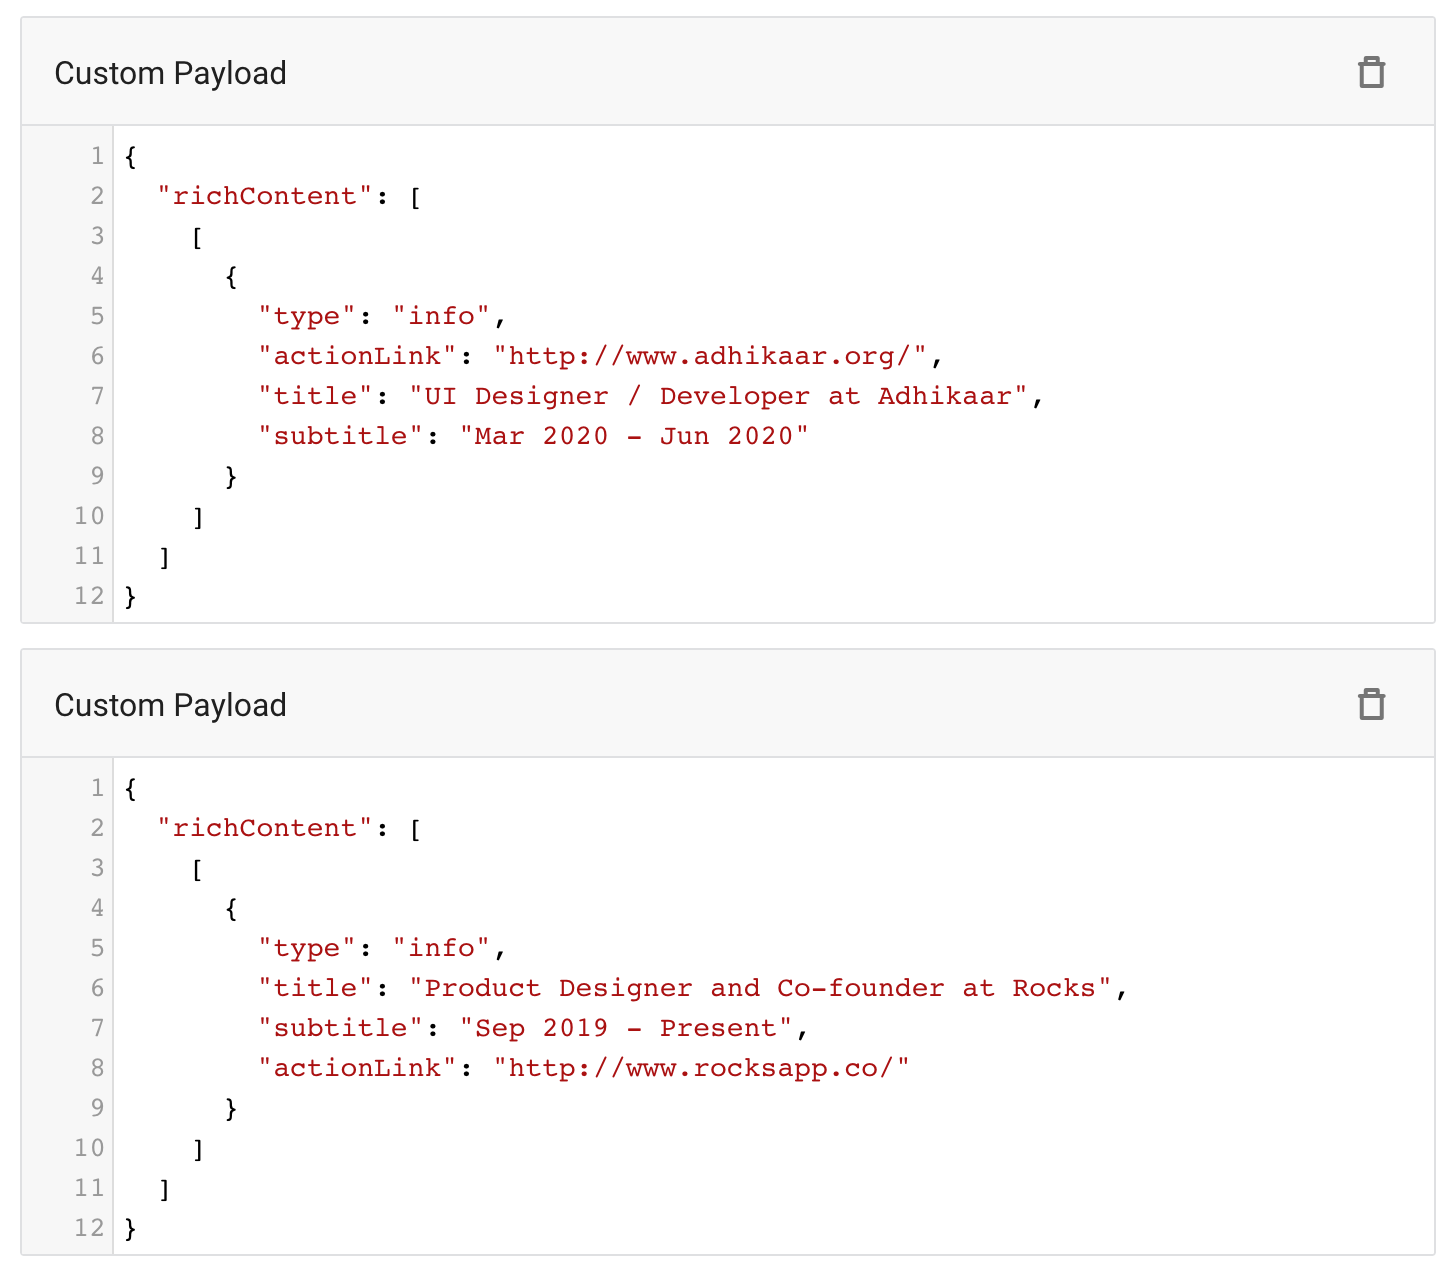
I wrote out all the questions that I’ve been frequently getting in my UX design interviews and organized it in an Excel spreadsheet so that I could keep track of what answers I still needed to add to the bot. I get a lot of questions about my experience, what I’m looking for in my next role, my technical skills, and software I use, etc. To show off my personality, I added fun little answers about my hobbies, sign, and favorite music.
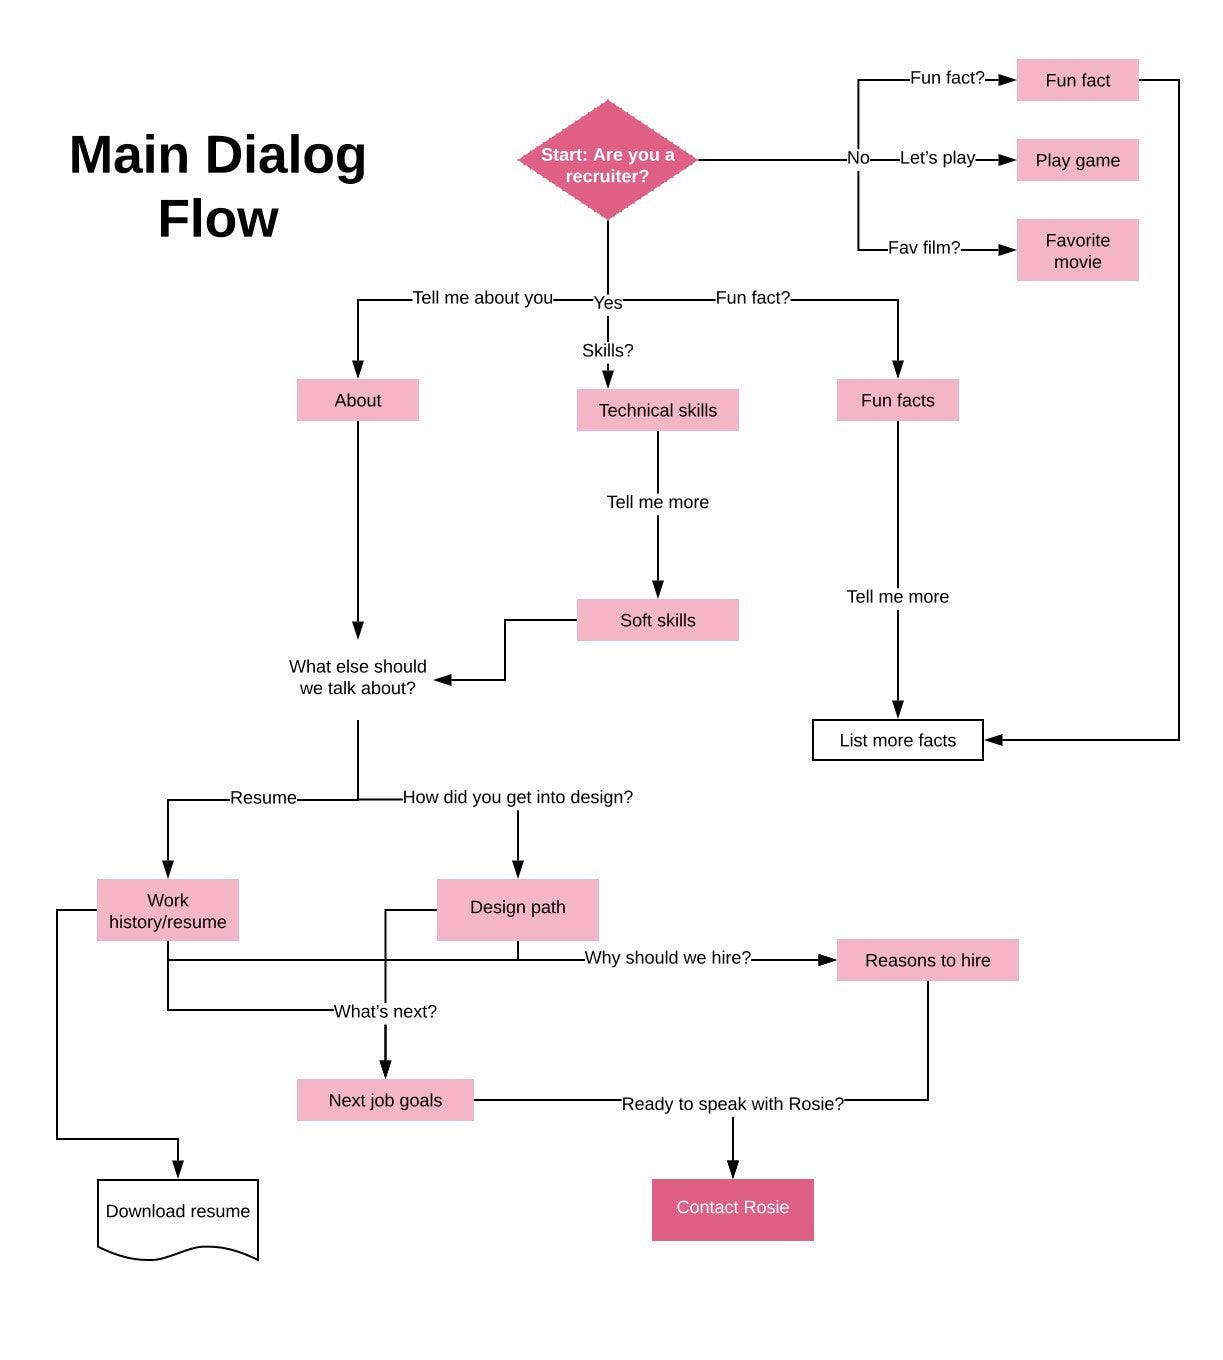
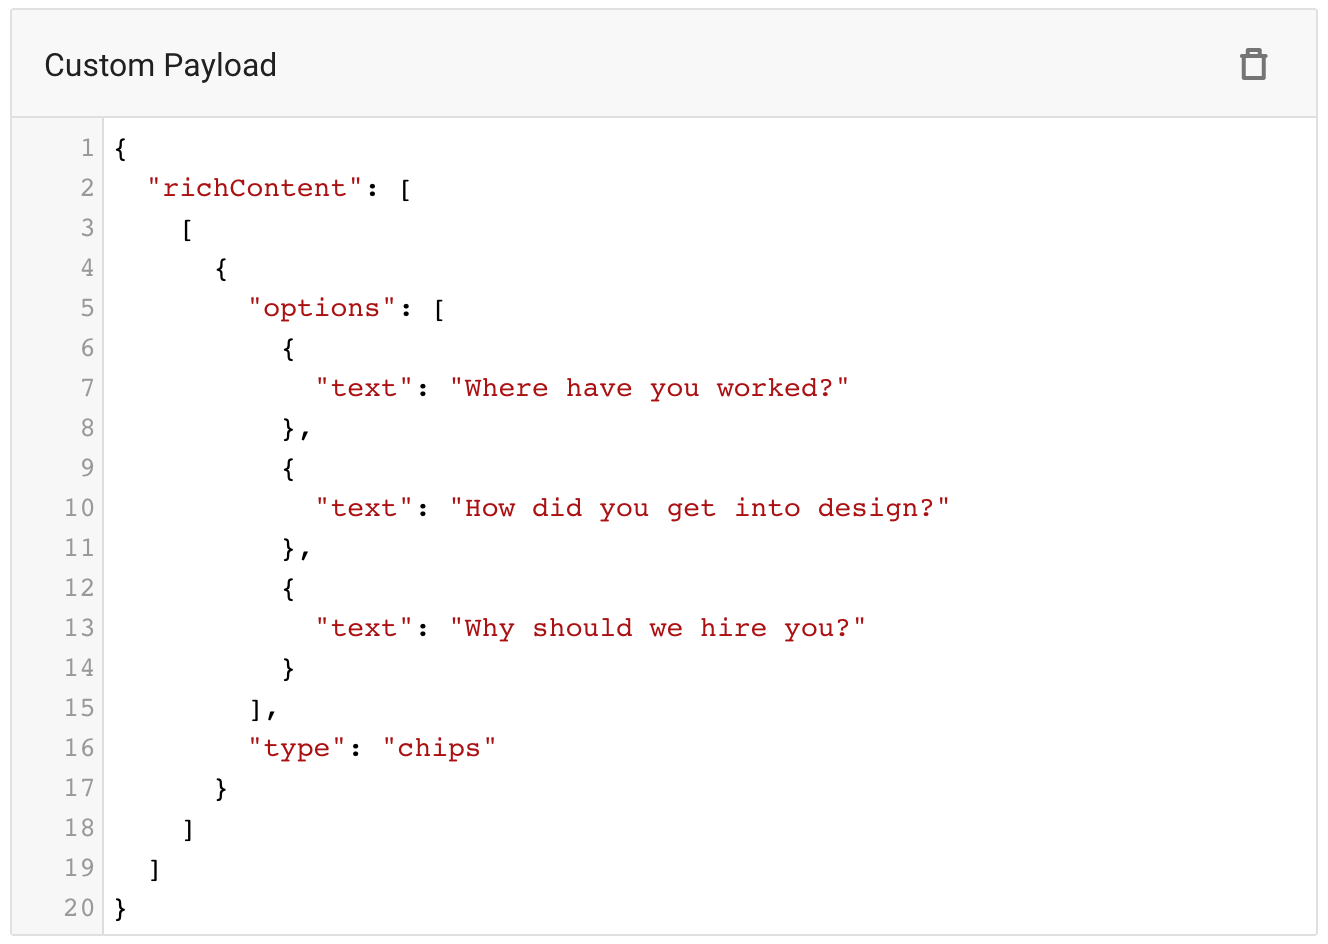
I detailed the user flow and visually mapped out the dialog, which helped me mark exit and entry points as well as guide the conversation with suggestion chips so that the recruiter would have a better idea of the type of questions they can ask me. I had other questions listed in my spreadsheet that I didn’t put into any suggestion chips so that it didn’t seem like the chatbot was dependent on them.
DialogFlow is simple to work and there’s a ton of free tutorials and documentation out there. Here are the basics, as well as some tips I picked up along the way:
- To begin, create an agent.
- Start making your intents, which is each step of what the chatbot will respond to. You should definitely name each intent to stay organized and structured.
- Add in training phrases, which are expressions that you expect the user to say. Avoid putting in one-word phrases that could be easily confused with something else you’re going to need them to say on a different intent, i.e. don’t just write “why,” be specific and write out the full phrase “why do you want to work here” as well as some iterations of the phrase. These training phrases are important because it’s what makes the bot smarter, and the more interactions you get with your chatbot, the more it’s able to recognize and connect phrases together.
- You can use Entities to define synonyms of certain words and reference options. If you use this, be sure to add your entity to your action and parameters. This will allow your bot to reference user input.
- You can write out your custom responses. Each text response can have variants, or you can have multiple text responses at once. Make sure you’re simulating a friendly, human agent-like experience for your users — they know it’s a chatbot, but it’s nice to make it feel like they’re actually talking to you. Plus, it’s a great way to let your personality shine and stand out to recruiters!
- Follow-up intents are a great way to make the bot more interactive. That is, setting up an intent to anticipate a yes or no response and putting out a custom response to handle the input without disrupting the flow by interpreting their response as a different phrase. I used these nested intents in my filters to make sure the recruiters would only have access to my answers if they answered that Black lives matter.
- On the right side of the DialogFlow interface, there’s an agent test. You can use this to type out a user expression and confirm that the agent is acting the way you want it. I tested my interactions after saving every intent.
- When you’re satisfied, you can deploy your bot under the Integrations section. In your embed code, you can edit the HTML and CSS customizations to change its colors to match your own website and add a profile picture for your bot.
Adding custom payloads
I didn’t want my bot to only have basic text responses, and I also wanted to implement special features like suggestion chips, links, etc. It requires a tiny bit of reading and understanding basic code, but DialogFlow’s documentation lists rich response messages, which lets your bot respond with links, images, suggestion chips, accordion text, lists, buttons, info cards, etc. Simply add the code under “Custom Payloads” under “Add new text response.”
Post-release and improving conversational AI
After my bot went public and I tweeted about it, I got an overwhelming number of user interactions. In DialogFlow, I can see the history of everyone’s interactions as well as any flagged unmatched requests (essentially, where the bot failed to interpret the user’s response). This is where I could learn more about what users were asking my bot that I didn’t anticipate, such as “where are you based?” and “salary requirements.” From looking through these interactions, I knew what other intents I needed to integrate into my bot in order to make it more effectively conversational.
Unfortunately, because of the controversial nature of the bot and the popularity of the tweet, I also got a ton of all lives matter people on my website leaving me hateful comments.
I wanted to make sure that the trolls still got a proper interaction with my bot rather than just the fallback intents. So, I got my bot to out-troll the trolls with some resources that would hopefully provide clarity on the subject.
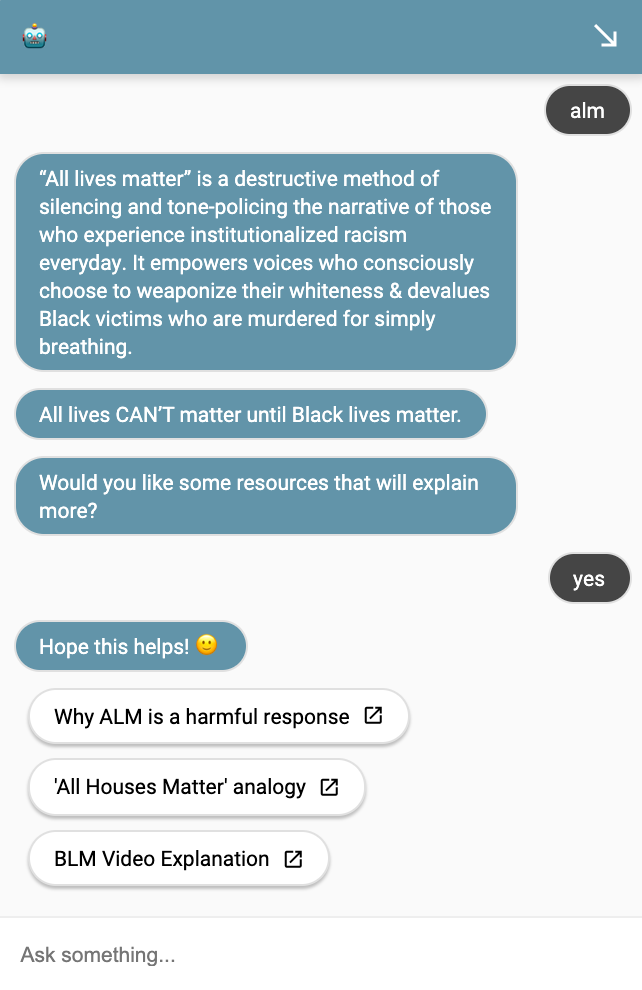
The bright side is that, thanks to NLP, the more the user interacts with the bot, the smarter it gets. That means that the more that trolls sent death threats and mean comments to my bot, the more it could recognize these hateful phrases and respond with some resources where the user can educate themselves about the BLM movement. Kill em’ with kindness.
So, did it work?
Well, I received a ton of sweet emails from kind-hearted people at Google, ServiceNow, etc. reaching out to offer an internal reference, introduce me to their Head of Design, or connect me to their employers. I’m crediting most of my current success to Twitter, which helped the chatbot go viral and gained the attention of companies around the world, from promising tech start-ups in London to neurotech AI companies in the Bay Area.
I’ve also been getting green lighted by companies who didn’t see the tweet, but mentioned how much they liked the chatbot in my initial phone call with them. So I would say, despite how controversial something like this seems, it’s definitely worked! Most importantly, it lets me speak out about my values and set up those expectations right at the beginning, instead of contributing design to something that I don’t believe in.
I’ve always been told to avoid “mixing business with politics,” but these issues are simply too loud to ignore anymore. In the wake of the death of countless Black people at the hands of police brutality and the protests that have followed, most companies have publicized their allegiance to the Black community.
I believe that we shouldn’t compromise our values to appear “neutral” and “professional” to recruiters. Adding features like this is a creative way to stand out to recruiters and empowers you to work with the right kind of people.
So you’re interested in UX design? Then join our online event, TNW2020, to explore the latest trends and emerging best practices in product development.
This article was originally published by Rosie Maharjan on UX Collective, a publication sharing curated stories on UX, visual & product design. You can read the original piece here.
Get the TNW newsletter
Get the most important tech news in your inbox each week.